The best travel photography gear for beginners and enthusiasts will vary, depending on many factors. It comes down to the type of travel photos you take, how you travel, personal preferences, and fit. I’ll take you through the essential gear both beginners and hobbyists should consider. You can then make your checklist based on your needs.
Table of Contents
Note: Product links are affiliate links, meaning I earn a small commission from qualifying purchases. I recommend products based on research, experience as a photographer, and working with pro photographers.
Here is a list of the essential travel photography gear that every travel photographer needs and will find helpful. I focus on beginners’ needs and enthusiasts looking to upgrade or wanting a good deal.
1. Best Travel Camera
There’s an age-old adage that you should shoot with whatever camera you have. And yes, you can shoot travel photography with a smartphone. But there are more benefits shooting with an interchangble-lens camera. You get better dynamic range, reach, and the ability to shoot in a higher-quality RAW format.
An APS-C camera is a good budget purchase if you’re a beginner or hobbyist. And I recommend buying a mirrorless one. Besides Pentax, all the major camera brands have stopped making DSLRs. And mirrorless cameras are more compact and travel-friendly.
I finally switched from a DSLR to a mirrorless camera this past year, and I couldn’t be happier. If you’re thinking of switching over, I recommend doing so. I sold my Nikon D7100, which I had for over ten years, to MPB.com and bought a Nikon Z 50.
It was a trade-off, as I lost image resolution. But the lighter, more compact camera body alone was worth it. And with an expanded ISO range, the Z 50 does okay in low light. Note that it doesn’t have image stabilization, but Nikon APS-C lenses have vibration reduction (VR).

Budget Travel Camera
Nikon Z 50
Versatile 16-50mm f/3.5-6.3 VR and 50-200mm VR f/4.5-6.3 kit lenses
The Canon and Sony equivalents in price and quality are the EOS R10 and the a6600. If you’re unfamiliar with each brand, see which feels best. I suggest you go to a store to handle these cameras.
You only need an expensive full-frame camera to become a professional or print your photos in a large format. If you have a bigger budget and want an affordable full-frame, I recommend the Nikon Z f, Canon EOS R8, or Sony a7 III. They give you the most bang for your buck!
Other options are a compact mirrorless camera, like the coveted FujiFilm X100VI. But most of these are less versatile with fixed wide-angle or more limited zoom lenses.
You might also want to look at a GoPro if you’re more of an adventure traveler or a drone like the DJI Mini 2 SE to get into aerial travel photography. These are cheaper options but aren’t meant for standard travel picture-taking. But they offer unique points of view and videography opportunities.
2. Best Travel Lens
The other benefit of buying an APS-C travel camera is the magnification with lenses. I purchased a brand new Nikon Z 50 with two kit lenses (16–50mm and 50–200mm). I really like the 16–50mm lens on the Z 50, which is a 24–75mm full-frame equivalent.
The wide 16–18mm range is helpful for landscapes and architectural interiors. The 35–50mm range is perfect for street and portrait photography. I only take out my 50–200mm for the occasional wildlife shot or zooming in on distant landscapes or urban scenes I want to crop.
You can buy the Canon EOS R10 with the 18–45mm kit lens. Again, it covers a nice wide-angle to standard focal length for most travel shots.
A versatile zoom lens, like the 18–150mm on the R10 or 18–135mm on the Sony a6600, can help you capture a wide range of scenes, from landscapes to portraits.
A wide focal length range eliminates the need to switch lenses, which can be cumbersome while traveling frequently. It’s something I considered, but I opted for the cheaper route. I primarily use the 16–50mm and occasionally switch to the telephoto.
For a versatile full-frame lens, I recommend Nikon’s Z 24–70mm, Canon’s RF 24–70mm F2.8L, or Sony’s 28–70mm with the a7 III (the best deal). Otherwise, I suggest buying lenses specifically for your travel photography niche if you have one.
A wide-angle prime lens is best for landscapes, architecture, and street photography. A standard prime lens like 35mm or 50mm is best for portraits and everyday shots, and telephotos are ideal for wildlife or safaris.
3. Best Lens Filters
A polarizing filter is a valuable addition to your travel photography kit. It reduces glare and enhances the colors in your images, mainly when shooting landscapes or water scenes. I have Marumi Fit+Slim circular polarizers that I keep on my lenses.
A neutral density (ND) filter is also helpful for long-exposure photography. It lets you capture smooth, blurred motion effects of things like flowing water or clouds. I have a standard ND filter (ND 8) by Marumi, which lets me reduce light by three stops.
When selecting filters, determine the correct thread size to ensure it matches your lens. You can also consider getting a filter system that lets you use the same filters across multiple lenses. And if you want to buy eco-friendly products, check out Urth’s lens filters. They plant trees and use sustainable materials!
4. Best Travel Tripod
A lightweight, portable tripod is essential for low-light, long exposure, and landscape photography. It helps you capture sharp, level travel images, especially when a faster shutter speed is impossible. Look for a tripod that is sturdy yet compact and easy to carry.
Carbon fiber tripods are a popular choice for travel. They offer a good balance of weight and sturdiness. Also, consider a tripod with features like adjustable leg angles and a ball head for maximum versatility. There are sometimes limitations on what kind of tripods are allowed in places, so discreet ones are best.
I bought a JOBY GorillaPod 3K Compact Tripod Kit. It’s a very portable tripod that fits nicely in my camera backpack. It’s sturdy, has a versatile ball head, and you can manipulate it as a selfie stick. It’s also reasonably priced and more discreet than full-sized tripods.

5. Extra Batteries and Power Bank
Ensuring you have multiple fully charged batteries for your camera is crucial. You don’t want to run out of power while out shooting. Camera batteries can drain quickly, especially when using features like Live View, GPS, or shooting in cold weather. Bring at least one or two spare batteries.
Also, consider investing in a portable battery charger you can use on the go. Like the Nikon Z 50, many new mirrorless cameras charge via USB. Remember to pack the right cables!
I have a heavy-duty Anker portable power bank for my laptop and camera. It’s been a lifesaver during power outages in travel destinations with developing infrastructure.
6. Extra Memory Cards and Portable Hard Drive
Bring high-capacity, high-speed memory cards to accommodate the large file sizes of your travel photos and videos. Look for cards with high write speeds. This feature lets you capture burst shots and record video without interruption.
You can’t go wrong with SanDisk’s 256GB Extreme PRO SDXC UHS-I Memory Card. If you buy smaller capacity cards, consider purchasing multiple ones to swap cards when they’re full.
If you’re going on a long trip, a portable hard drive can be a valuable addition to your travel photography kit. It lets you back up your photos and videos. It also frees up space on your memory cards and ensures your precious memories are safe, even if something happens to your camera or cards.
Look for a rugged, lightweight hard drive with ample storage capacity for your photo and video files. Some portable hard drives even offer features like wireless connectivity. This feature makes it easy to transfer and backup your files. I have and like Lacie’s Rugged Mini 2TB Portable External Drive.
7. Lens and Sensor Cleaning Supplies
Keeping your camera gear in top condition is crucial. It ensures you take consistent, high-quality travel images. Bring a lens-cleaning cloth or pen and sensor cleaning supplies to remove dust, dirt, and smudges from your lenses and camera sensor.
Also, consider investing in a small brush or air blower to remove dust from your gear while on the go. It saves you from fixing anomalies when you edit your photos later.
Consider buying an all-in-one camera cleaning kit that includes all the above and more! Regular cleaning not only helps prevent image quality issues. It also extends the lifespan of your travel photography equipment.
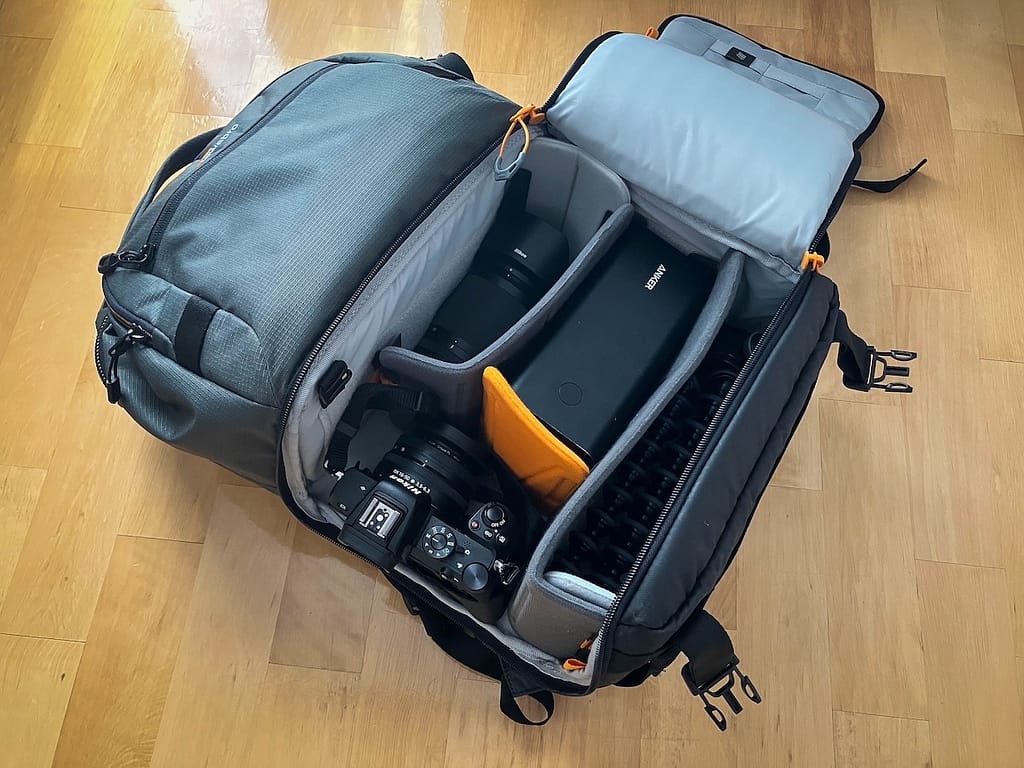
8. Best Travel Camera Bag
A good camera bag or backpack to hold all your gear and protect it from the elements is essential for travel photography. Consider it an investment to safeguard your photography equipment.
Features to look for will depend on how you travel and where and what you shoot. Generally, look for a bag with padded compartments, weatherproofing, and comfortable straps. It’s also ideal to have a side-access compartment to grab your camera quickly.
Also, consider the size and weight of your gear when choosing a bag. You want something easy to carry and maneuver, especially when navigating crowded cities or hiking trails. Some bags even have extra compartments for non-photographic items, making them a versatile choice for travel.
One of my first bags was Peak Design’s Everyday Backpack 20L. I recommend it for urban travel photographers and short day trips. It doesn’t hold up to the wear and tear of long-term or more rugged travel. But it’s a light, attractive bag that’s eco-friendly!
I have also used an f-Stop Ultralight 30L camera bag in the past. These f-stop bags are geared for outdoor and adventure photographers who shoot extreme sports or are out in the wild. They hold up well in extreme weather and are designed for rugged conditions. But they’re not great for everyday travel.
I finally settled on a Lowepro Fastpack PRO BP 250 AW III 31L. It fits my travel photography gear plus other travel items well. It’s pretty snug under airplane seats or on buses. But it meets hand-luggage requirements for air travel and securely holds my 13-inch MacBook Pro in its dedicated laptop pouch.
I also bought Lowepro’s Large GearUp Case. It fits snugly in the top compartment and holds my camera accessories. A 31L is a large bag for an APS-C setup, but I wanted the extra space. If you want a smaller bag., the BP 250 AW III 21L is a good alternative.
There are many camera bag options out there for travel photography. I recommend finding a bag with side and front access like the Lowepro. These two ways to access your bag are helpful when you’re out shooting and when you’re at airport security.

Excellent Travel Camera Bag
Lowepro Fastpack PRO
BP 250 AW III 31L
Travel Photography Gear Tips
- Travel light and pack only the essentials. Don’t worry about having all the different focal lengths all the time. Go for a lens that covers the types of travel photos you enjoy taking most. A more focused kit also makes you take more creative travel shots!
- Buy new photo equipment with a warranty (Avoid Amazon “renewed” or used products). Spending a bit extra ensures the longevity of your gear and peace of mind knowing your gear has some insurance.
- Keep your gear safe, whether with a camera bag or strap. Be aware of where and when you’re using your camera. Avoid taking it out in unsafe neighborhoods or crowded tourist areas with many people jostling around you.
What’s In My Camera Bag?
- Camera: Nikon Z 50 (APS-C)
- Lens: NIKKOR Z 16–50mm (24–75mm full-frame equivalent)
- Filters: Marumi Fit+Slim circular polarizer, Marum ND8 neutral density filter
- Extra Battery: Nikon EN-EL25a
- Portable Charger: Anker Power Bank 20,000
- Extra Memory Card: Lexar 64GB Professional
- Portable Hard Drive: LaCie Rugged 2TB Mini external drive
- Camera Cleaning Supplies: Lens pen, air blower, cleaning cloth
- Camera Backpack: Lowepro Fastpack PRO BP 250 AW III 31L